Part 1 · Fast frames, missing targets: a drone simulator on a laptop CPU1편 · 빠른 프레임, 사라진 타깃: 노트북 CPU로 드론 시뮬레이터 만들기第 1 篇 · 帧很快,目标却不见了:用笔记本 CPU 搭建无人机仿真
Published:
Series Building and Evaluating a Drone VLA from Scratch드론 VLA를 처음부터 만들고 평가하기从零构建并评估无人机 VLA Season 1 · Part 1 of 13
One question runs through it: if you change only the words, does the drone fly somewhere else? CPU-first, in simulation. Seasons 1–3 use a small language-conditioned policy trained from scratch; the pretrained VLA (SmolVLA) arrives in Season 4.관통하는 질문은 하나입니다: 말만 바꾸면 드론이 다른 곳으로 날아갈까? CPU 우선, 시뮬레이션에서 진행합니다. 시즌 1–3은 처음부터 학습한 작은 language-conditioned 정책을, 시즌 4에서 사전학습 VLA(SmolVLA)를 다룹니다.贯穿全系列的问题只有一个:只改变指令文字,无人机会飞向别处吗?以 CPU 为先,在仿真中进行。第 1–3 季使用从零训练的小型 language-conditioned 策略,第 4 季引入预训练 VLA(SmolVLA)。 Code
Season 1 · Make the question testable
- Fast frames, missing targets: a drone simulator on a laptop CPU
- From a real drone's spec sheet to a testable task
- Same scene, different words: a counterfactual dataset
- The policy that did not listen
Season 2 · Find out what the result means
- Borrowing from VLAs: action tokens and action chunks
- Separating perception from choice: a world model and a planner
Season 3 · Change the system, keep the behaviour
- One evaluation contract for Python and C++ (coming)
- What changes when the policy runs in ONNX and INT8? (coming)
- A C++ inference runner, measured end to end (coming)
- Turning evaluation into a release gate (coming)
Season 4 · Change the model, close the data loop
- Adapting SmolVLA to a drone (coming)
- Which failures should become the next dataset? (coming)
- Taking the evaluation contract into ROS 2 and PX4 (coming)
- A drone simulator that runs entirely on a laptop CPU records 34.5 camera frames per second, about 7x faster than real time.
- Measuring every stage changed two decisions: the PID controller costs 2.7x the environment steps it drives, and the library's default camera settings double the render stage, so I replaced them.
- The first recording passed every check I had written, yet the targets were cut out of most frames. Only looking at the images caught it.
- 노트북 CPU만으로 도는 드론 시뮬레이터가 초당 34.5장의 카메라 프레임을 녹화합니다. 실제 시간보다 약 7배 빠릅니다.
- 단계별로 시간을 재 보니 결정 두 개가 바뀌었습니다. PID 컨트롤러가 환경 스텝의 2.7배 시간을 쓰고 라이브러리 기본 카메라 설정은 렌더 시간을 2배로 늘려서 카메라를 직접 만들었습니다.
- 첫 녹화는 제가 만든 검사를 모두 통과했지만 대부분의 프레임에서 타깃이 잘려 있었습니다. 이미지를 직접 보고서야 잡았습니다.
- 完全运行在笔记本 CPU 上的无人机仿真,每秒录制 34.5 帧相机图像,约为实时的 7 倍。
- 逐阶段计时改变了两个决定:PID 控制器耗时是其驱动的环境步的 2.7 倍,而库默认的相机设置会让渲染时间翻倍,于是我换掉了它。
- 第一次录制通过了我写的所有检查,但大多数帧里目标被裁出了画面。只有亲眼看图像才发现。
正文为英文,图表与代码与语言无关。
If I change only the words, will the drone fly somewhere else? Before I could even ask that, my simulator produced 1,000 frames that passed every automated check I had written, and a contact sheet showed the targets cut out of view. This post is about turning a CPU-only simulator into something that produces usable observations, and measuring what each recorded frame costs.
The first recording looked valid, and wasn’t
The setup is a laptop with no NVIDIA GPU: WSL2 + Ubuntu, PyBullet through gym-pybullet-drones, and a camera on the drone that records a 128 x 96 image every 0.2 simulated seconds.
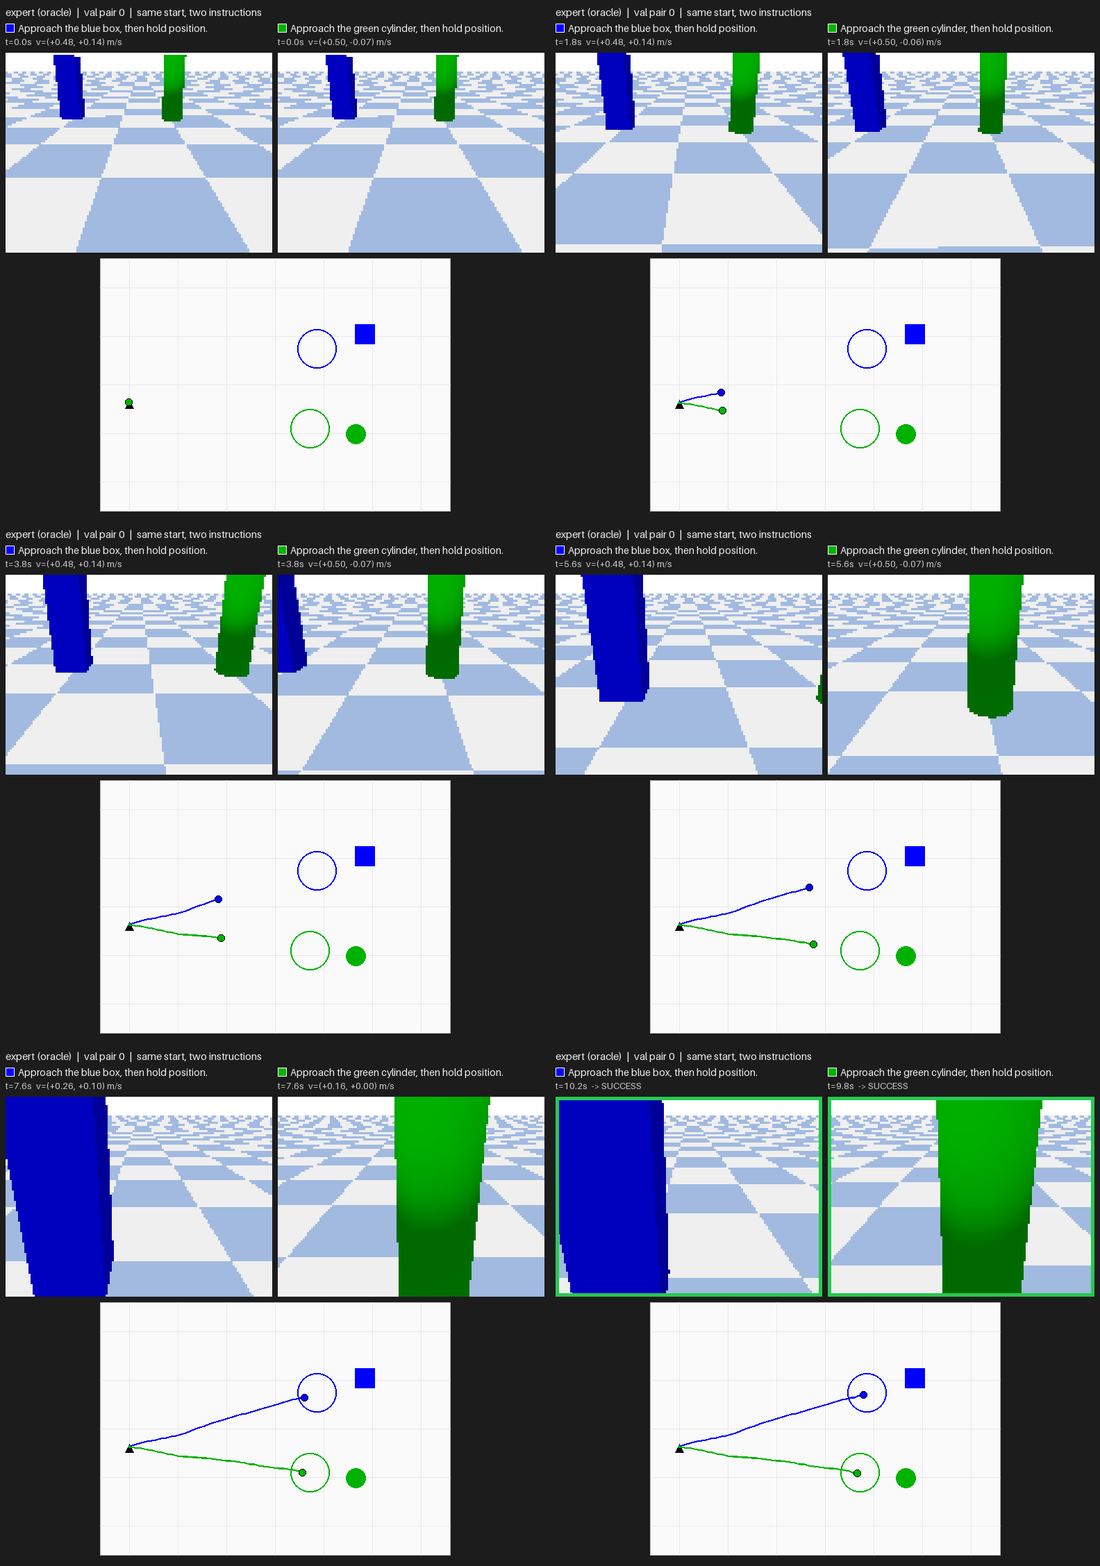
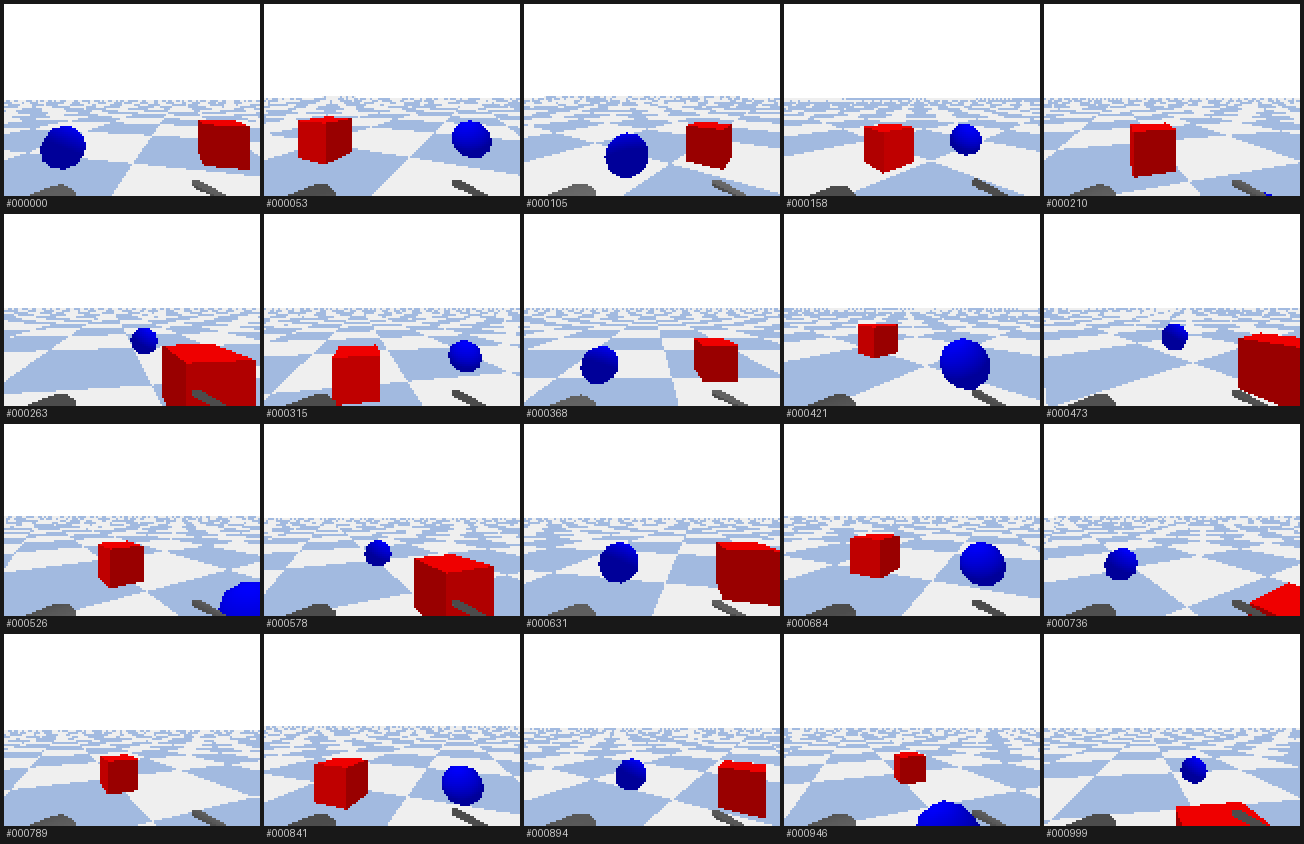
My first 1,000-frame recording passed every check I had written: right count, right shape, no NaNs, no duplicate images, nothing blank. Then I laid 20 frames out as a contact sheet and looked at them. In most of them the targets were cut off at the bottom edge.
Hypothesis: the drone was flying too high to see objects on the floor. Check: it flew at about 1 m, and the targets sat about 1.2 m ahead at 0.15 m. Looking down at them takes atan(0.85 / 1.2) ≈ 35°, but the level camera’s 60° vertical field of view only reaches 30° below its centre line.
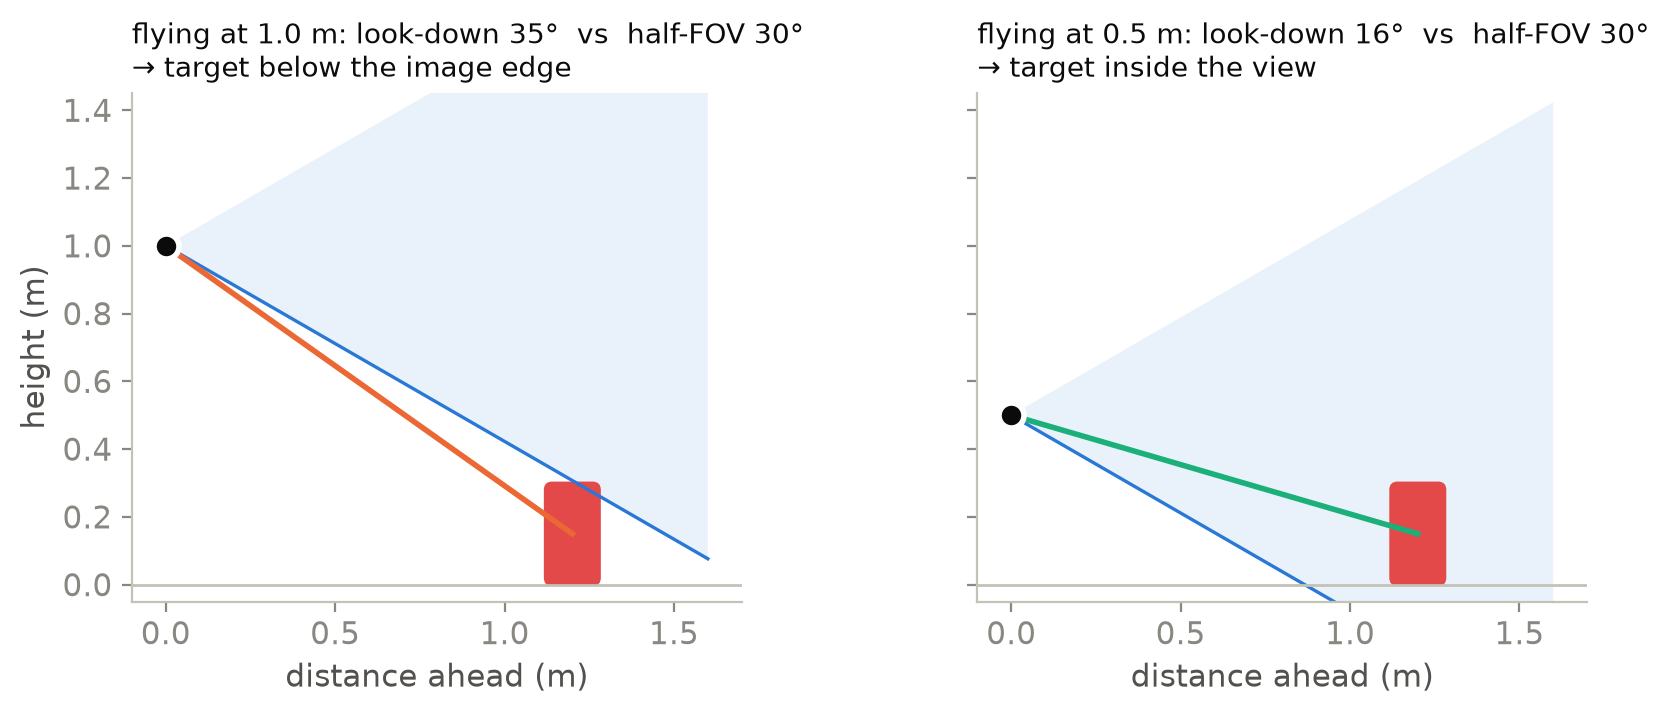
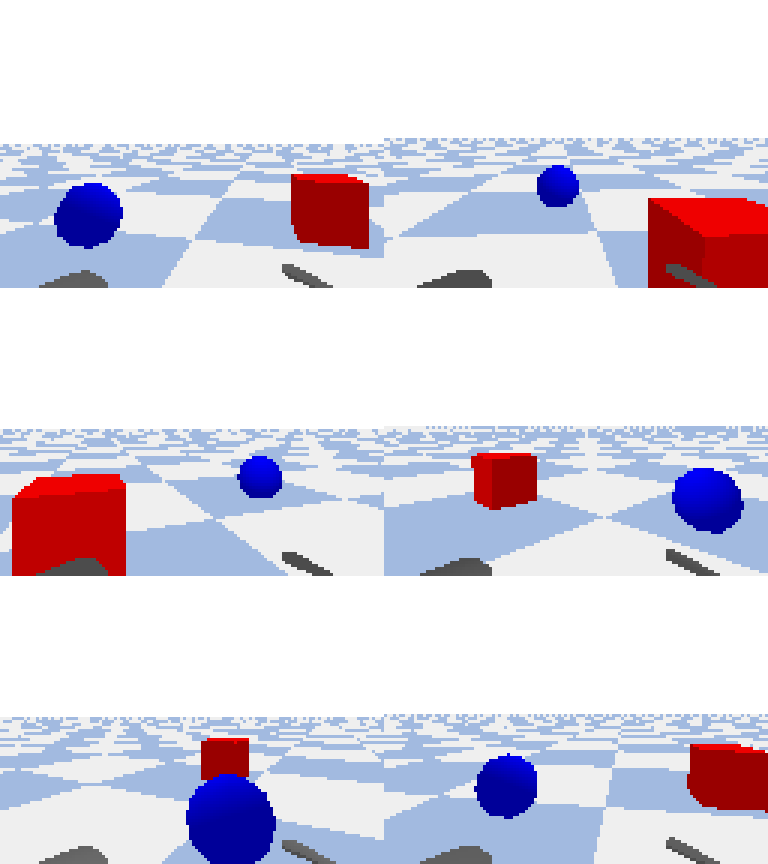
Fix and verification: fly at 0.4 to 0.6 m and record again. The new contact sheet shows both targets in view:
A frame of sky and floor is non-blank and unique, so none of the checks I had written could see this. Looking at the data did. I’ll come back to this lesson throughout the series. The guard that would catch it automatically is a target-visibility count from the segmentation mask.
The minimal simulator
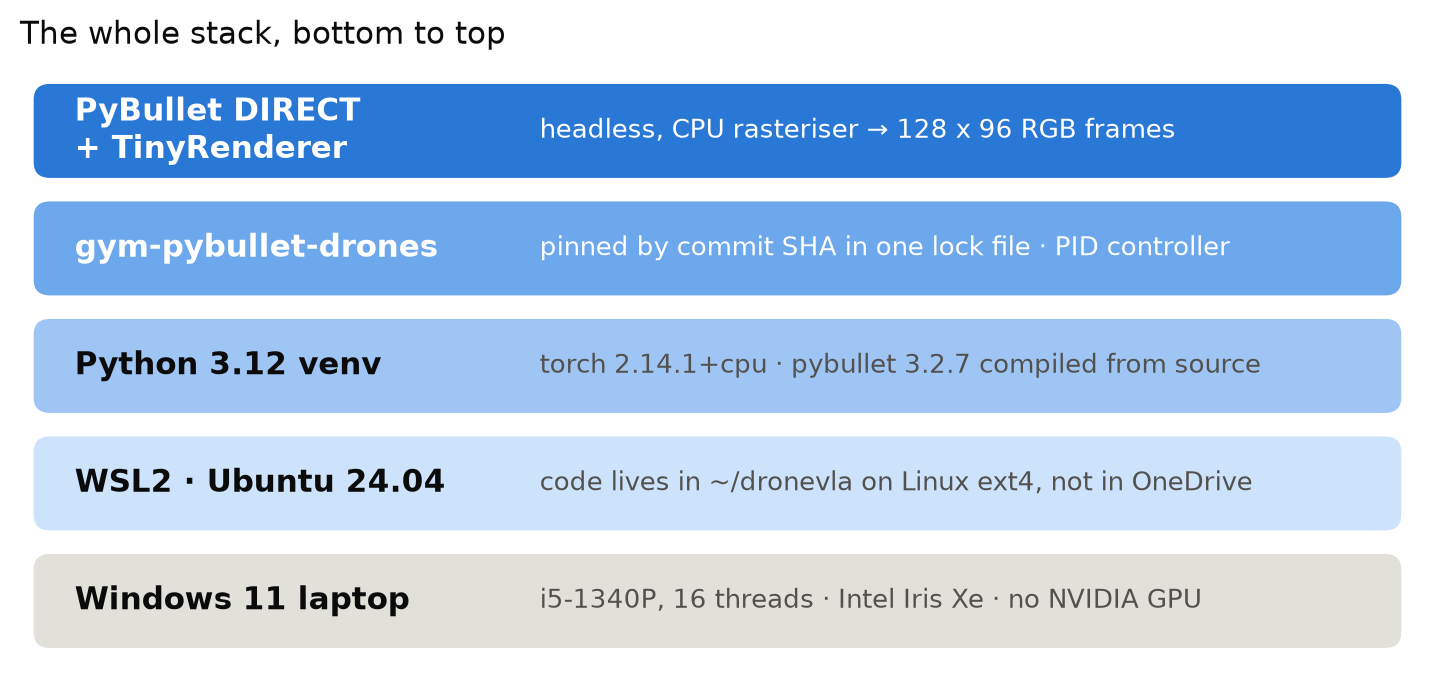
Two choices matter for everything after this:
- Linux, outside OneDrive. The code runs in WSL2’s own filesystem. Later stages (ROS 2, PX4, a C++ core) are Linux-first, and I didn’t want a sync client or a folder name with spaces and Korean letters in the build path.
- A CPU renderer. PyBullet’s TinyRenderer draws the camera image in software, so the missing GPU never enters the picture.
Three clocks
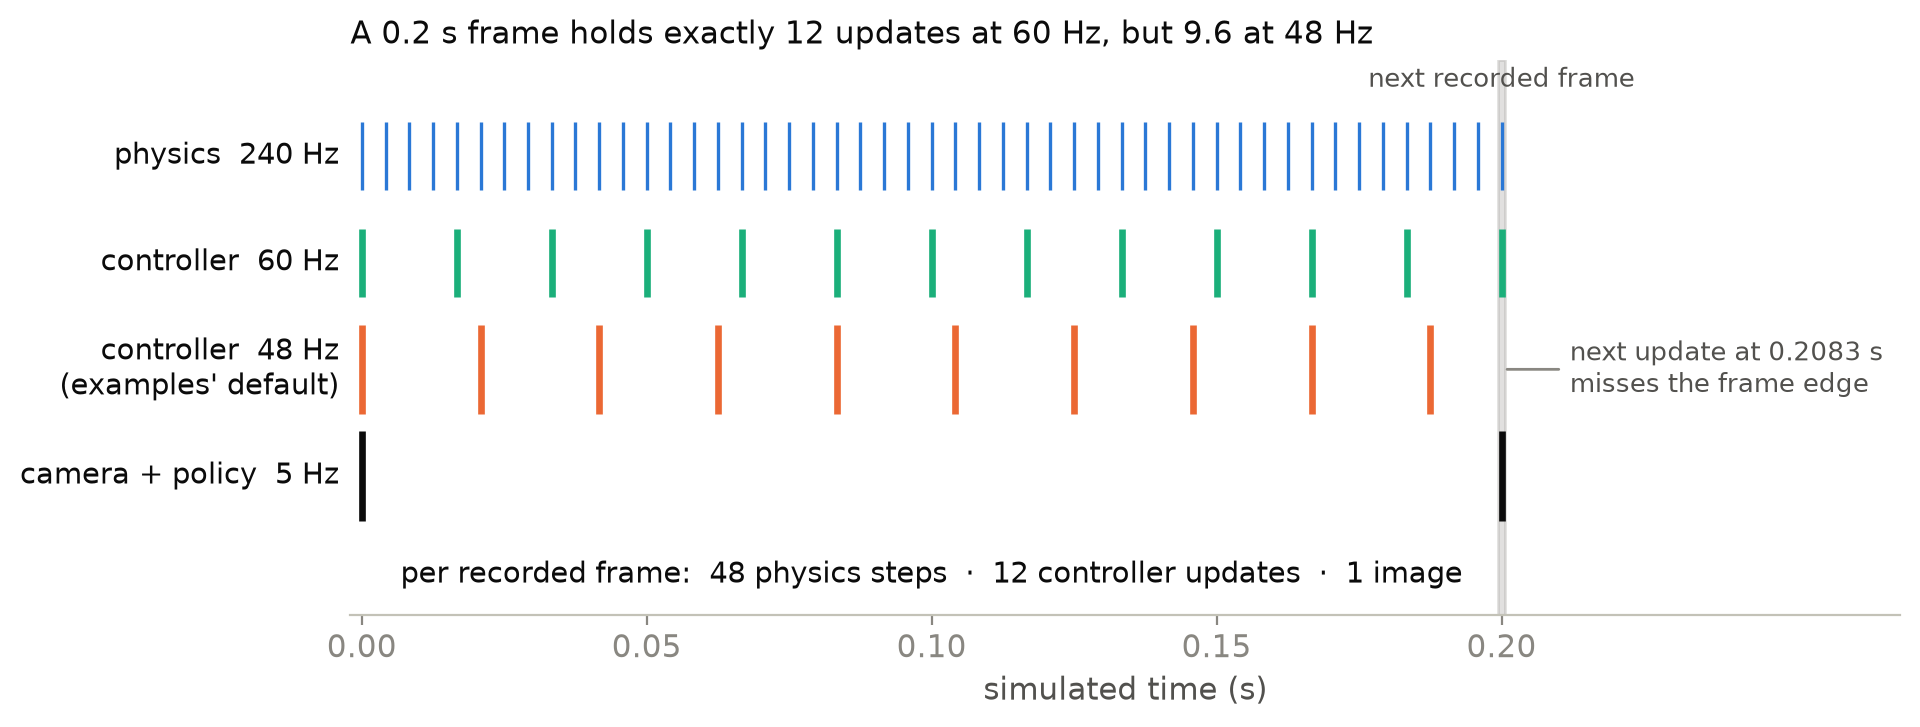
- Physics, 240 Hz. The engine advances the world 1/240 s per step.
- Controller, 60 Hz. A PID controller turns “fly this way” into four motor speeds. It reacts to the current error, how that error has added up, and how fast it is changing.
- Camera and policy, 5 Hz. Every 0.2 s the drone takes a picture and the policy decides what to do next.
So one recorded frame is 48 physics steps and 12 controller updates. I started with the examples’ 48 Hz, but that puts 9.6 updates in a frame, so I switched to 60 Hz: my fixed-tick recording loop then runs exactly 12.
What the drone actually sees
To see what is in those pixels, I rendered one frame with PyBullet’s segmentation mask, which labels every pixel with the object it belongs to, and counted:
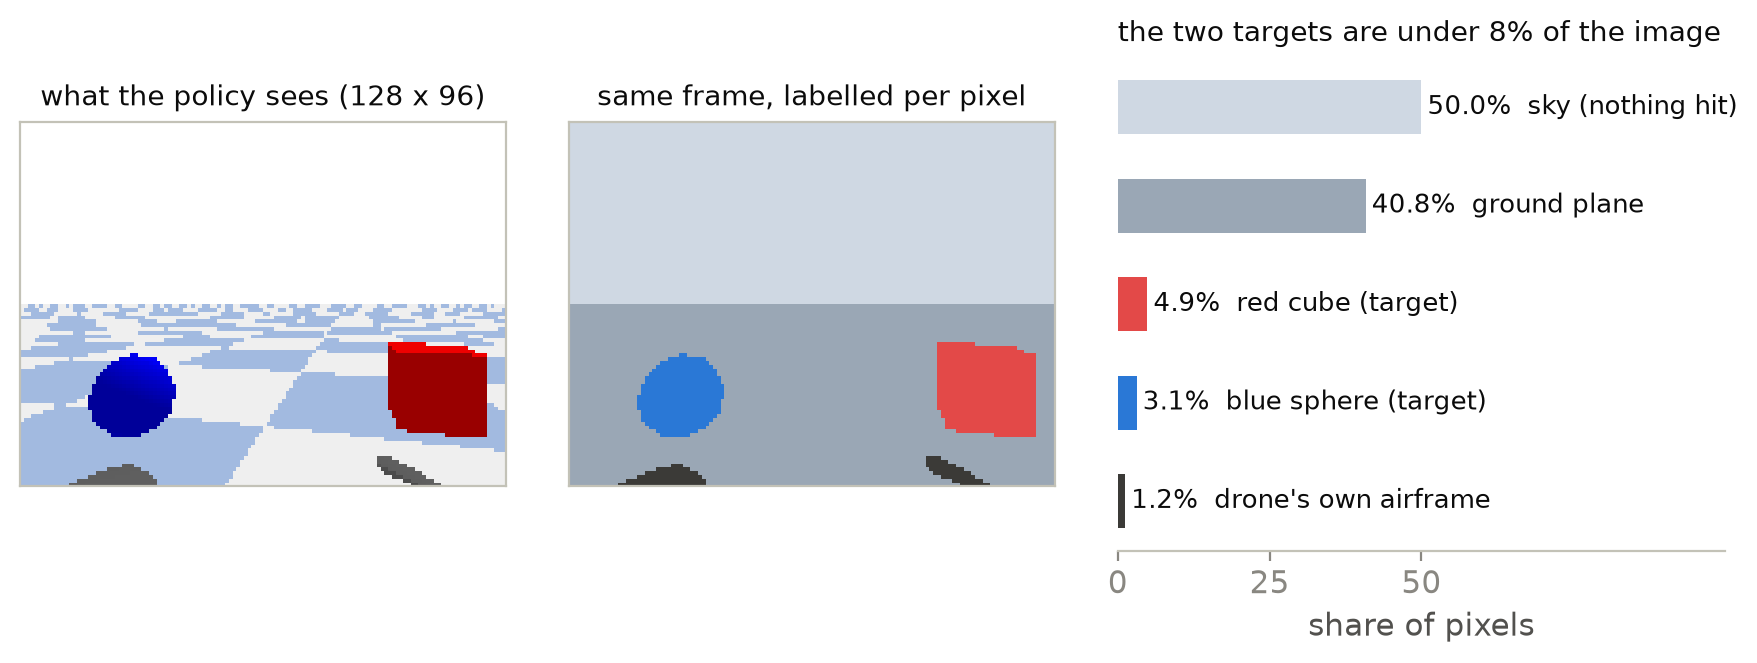
When so little of the image carries the answer, a small policy can latch onto an easier cue instead. Part 4 shows a policy doing exactly that.
The camera call is short (simplified; full code in dronevla/camera.py):
def render(self, pos, quat, client=0):
    """Return one frame as (height, width, 3) uint8, alpha dropped."""
    w, h, rgba, _, _ = p.getCameraImage(
        width=self.width, height=self.height,          # 128 x 96
        viewMatrix=self.view_matrix(pos, quat),        # where the drone is and where it looks
        projectionMatrix=self._projection,             # 60 deg vertical FOV, square pixels
        shadow=0,                                      # off: the default doubles render time
        flags=p.ER_NO_SEGMENTATION_MASK,               # off: the policy never sees it
        renderer=p.ER_TINY_RENDERER,                   # CPU software rasteriser, no GPU
        physicsClientId=client,
    )
    return np.asarray(rgba, dtype=np.uint8).reshape(h, w, 4)[:, :, :3]
Where one recorded frame spends its time
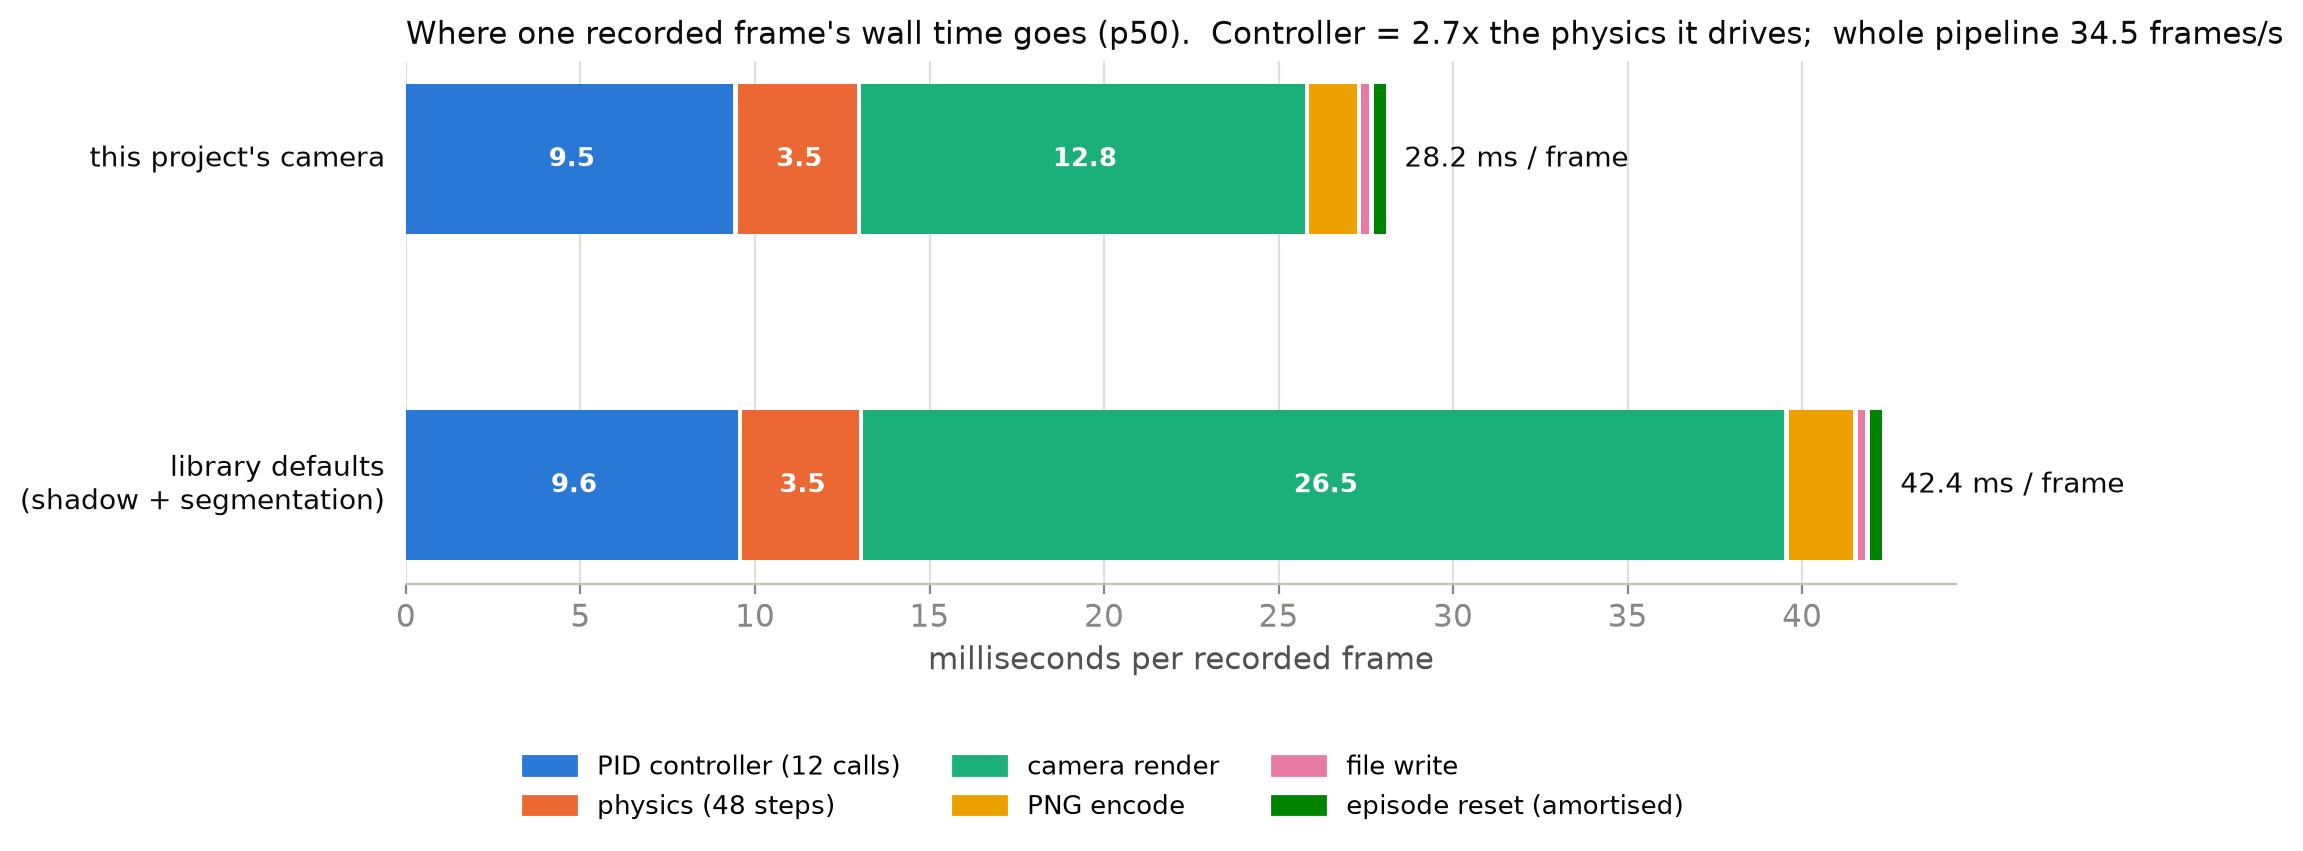
I timed every stage of producing a recorded frame over 1,000 frames, after 50 warm-up frames that were thrown away. I report medians (p50). I repeated the whole run in a second process, and throughput agreed within 1.7%.
Two findings changed decisions:
- The controller costs more than the physics. Twelve calls to the pure-Python PID controller take 9.5 ms. The 12 environment steps they steer, 48 physics steps inside, take 3.5 ms. Every policy I evaluate later pays this cost, so it is a fixed part of every experiment’s time budget.
- Defaults matter. The library’s built-in camera renders shadows and a segmentation mask. Neither is useful here, and together they double the render stage, from 12.8 to 26.5 ms per image. That is why the project has its own camera.
The timing loop puts a stopwatch around each stage (simplified; full code):
for i in range(n_frames):
    t_physics, t_control = 0.0, 0.0
    for _ in range(ctrl_per_frame):                  # 12 controller periods per frame
        t0 = time.perf_counter()
        obs, *_ = env.step(action)                   # 4 physics steps each
        t_physics += time.perf_counter() - t0
        t0 = time.perf_counter()
        action[0], *_ = ctrl.computeControlFromState(...)
        t_control += time.perf_counter() - t0

    t0 = time.perf_counter(); rgb = cam.render(pos, quat); t_render = time.perf_counter() - t0
    t0 = time.perf_counter(); png = encode_png(rgb);       t_encode = time.perf_counter() - t0
    t0 = time.perf_counter(); path.write_bytes(png);       t_write  = time.perf_counter() - t0
Can I afford the dataset?
The plan assumed 6 to 15 KB per frame, stored as JPEG. Measured:
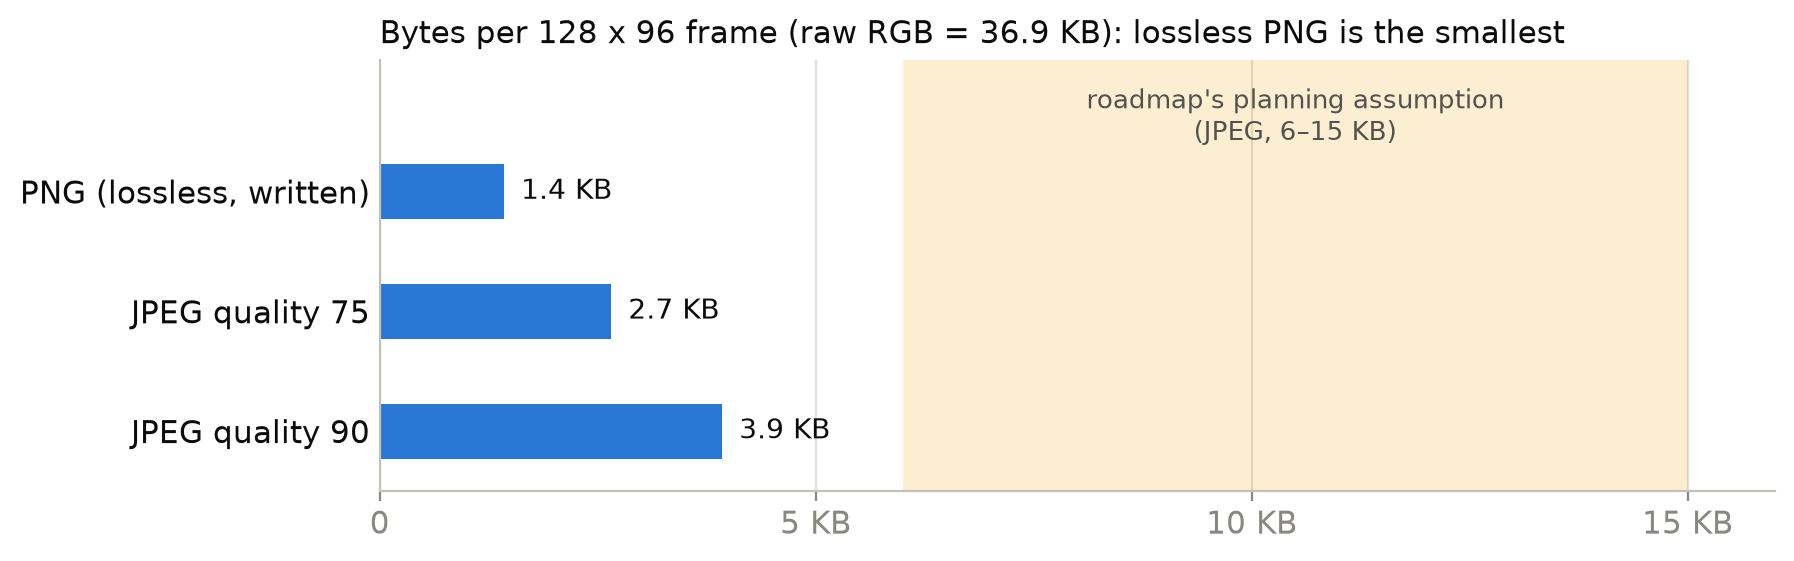
For these 128 x 96 frames of flat colour, lossless PNG is the smallest option: 1.4 KB, against 2.7 to 3.9 KB for JPEG. At the measured rate, the planned 200,000 frames would take about 1.6 hours and 0.3 GB, or 2.4 hours if I keep the plan’s 1.5x safety margin. These numbers extrapolate the measured rate; that dataset doesn’t exist yet.
What this part does not show
- The scene is a floor plus two plain shapes. Richer scenes render slower and compress worse.
- The laptop was busy during the runs, with an editor and a browser open. A quiet machine could land on either side of these numbers.
- Everything here is simulation. Nothing has flown a real drone.
Next
A fast simulator is not yet a believable one. Part 2 takes a real drone’s spec sheet and asks what a 27 g simulated quadrotor can honestly borrow from it, then fixes the task and how it is scored, before any model is trained.
Appendix
A. Two reproducibility traps (pybullet build, first CI run)
pybullet built without numpy. On Python 3.12, pybullet has no pre-built wheel, so pip compiles it. pip compiles in an isolated environment where numpy is invisible. The result still works, but getCameraImage then returns Python lists, and every render timing quietly includes a list conversion. I install numpy first, build pybullet with --no-build-isolation, and CI asserts pybullet.isNumpyEnabled() == 1 on every run. (I caught this by checking before it bit.)
The first CI run failed. To save time, I left torch out of the CI install because the profiler never imports it. pip check in a fresh clone showed why that can't pass: gym-pybullet-drones requires stable-baselines3, which requires torch. CI now installs the whole lock file, with torch from PyTorch's CPU-only index rather than the default one, which pulls several GB of CUDA packages. It then diffs pip freeze against the lock file. The next run passed.
B. Turning on the GPU driver lowered the OpenGL version
By default, OpenGL in WSL2 runs on the CPU (llvmpipe). GALLIUM_DRIVER=d3d12 routes it through the Intel GPU. Diffing the two glxinfo outputs showed a trade, not a pure speed-up: the GPU path offers OpenGL 4.1, the software path 4.5. TinyRenderer uses no OpenGL, so it doesn't matter yet. It will matter for Gazebo later.
C. Reproduce (setup, measurement, figures)
Ubuntu 24.04 (native or WSL2), Python 3.12, build-essential. Commit 9849050.
git clone https://github.com/Ckck12/Drone_VLA_Simulation.git dronevla && cd dronevla
git checkout --detach 98490502e80c0cf50a65765619e6d72f03ee88b0
SHA=$(sed -n 's/.*gym-pybullet-drones\.git@\([0-9a-f]\{40\}\).*/\1/p' env-lock-candidate.txt)
git clone https://github.com/learnsyslab/gym-pybullet-drones.git third_party/gym-pybullet-drones
git -C third_party/gym-pybullet-drones checkout --detach "$SHA"

python3.12 -m venv .venv && source .venv/bin/activate
pip install --upgrade pip setuptools wheel
pip install "$(grep '^numpy==' env-lock-candidate.txt)"          # before pybullet
pip install --no-build-isolation "$(grep '^pybullet==' env-lock-candidate.txt)"
pip install "$(grep '^torch==' env-lock-candidate.txt)" --index-url https://download.pytorch.org/whl/cpu
grep -v -e '^-e ' -e '^torch==' env-lock-candidate.txt > /tmp/req.txt
pip install -r /tmp/req.txt
pip install --no-deps -e third_party/gym-pybullet-drones
pip check

python -m dronevla.profile_env --frames 1000 --renderer tiny --out reports/env.json
python scripts/figures/blog01_environment.py      # every figure in this post
References: what I took from each
- gym-pybullet-drones provides a quadrotor model and a PID controller on top of PyBullet. → I pinned it by commit and kept its controller, but replaced its camera, whose defaults cost twice the render time.
- PyBullet Quickstart Guide documents
getCameraImageand its CPU TinyRenderer. → On a laptop without a GPU, that path takes the GPU out of the question entirely. - pip: build system interface explains that builds run in an isolated environment by default. → Good for reproducibility, but it hid numpy from pybullet’s compiler, so I turn isolation off for that one package and assert the result.
Summary (STAR)
SSituation
The series needs a drone simulator on a laptop with no NVIDIA GPU: WSL2 + Ubuntu, PyBullet through gym-pybullet-drones, and an onboard camera that records a 128 x 96 image every 0.2 simulated seconds. My first 1,000-frame recording passed every automated check I had written.
TTask
Turn the CPU-only simulator into something that produces usable observations, and measure what each recorded frame costs, so I know whether the planned 200,000-frame dataset is affordable.
AAction
I laid 20 frames out as a contact sheet, saw the targets cut off, and traced it to geometry: seeing the targets takes 35° below the level camera’s centre line, and its field of view only reaches 30°. I lowered the flight to 0.4 to 0.6 m, set the controller to 60 Hz so a frame holds exactly 12 updates, replaced the library camera to drop shadows and the segmentation mask, and timed every stage over 1,000 frames.
RResult
The pipeline records 34.5 frames per second (6.9x real time) at 12.8 ms per render and 113 MB peak memory. The PID controller (9.5 ms) costs more than the 12 environment steps it drives (3.5 ms), and PNG at 1.4 KB per frame puts the planned 200,000 frames at about 1.6 hours and 0.3 GB. None of the automated checks caught the clipping; looking at the images did.
말만 바꾸면 드론이 다른 곳으로 날아갈까요? 이 질문을 꺼내기도 전에 문제가 생겼습니다. 시뮬레이터가 만든 프레임 1,000장이 제가 작성한 자동 검사를 모두 통과했습니다. 그런데 컨택트 시트(contact sheet)로 펼쳐 보니 타깃이 화면 밖으로 잘려 있었습니다. 이 글은 CPU만 쓰는 시뮬레이터가 쓸 만한 관측을 내놓도록 고친 과정과 녹화 프레임 한 장에 드는 비용을 잰 기록입니다.
멀쩡해 보였던 첫 녹화
실험 환경은 NVIDIA GPU가 없는 노트북입니다. WSL2 + Ubuntu 위에서 gym-pybullet-drones로 PyBullet을 돌립니다. 드론에 단 카메라는 시뮬레이션 시간 0.2초마다 128 x 96 이미지를 한 장씩 찍습니다.
처음 녹화한 1,000 프레임은 제가 작성한 검사를 모두 통과했습니다. 개수와 배열 모양(shape)이 맞았고 NaN도, 중복 이미지도, 빈 이미지도 없었습니다. 그다음 프레임 20장을 컨택트 시트로 펼쳐 놓고 직접 봤습니다. 대부분의 프레임에서 타깃이 아래쪽 가장자리에 걸려 잘려 있었습니다.
가설: 드론이 너무 높이 날아 바닥에 놓인 물체가 시야에 들어오지 않습니다. 확인: 드론은 약 1 m 높이로 날았고 타깃은 약 1.2 m 앞, 높이 0.15 m에 있었습니다. 타깃을 내려다보려면 atan(0.85 / 1.2) ≈ 35° 아래를 봐야 합니다. 그런데 수평으로 단 카메라는 수직 시야각이 60°라서 중심선 아래로 30°까지만 담습니다.
수정과 검증: 0.4~0.6 m 높이로 날도록 바꾸고 다시 녹화했습니다. 새 컨택트 시트에서는 두 타깃이 모두 보입니다.
하늘과 바닥만 찍힌 프레임도 비어 있지 않고 중복도 아니어서 제가 작성한 검사로는 이 문제를 잡을 수 없었습니다. 문제는 데이터를 직접 보고서야 드러났습니다. 이 교훈은 연재 내내 다시 꺼내겠습니다. 이 문제를 자동으로 잡으려면 세그멘테이션 마스크에서 타깃이 보이는 픽셀 수를 세는 검사가 있어야 합니다.
최소한의 시뮬레이터
이후 모든 단계에 영향을 주는 선택이 두 가지 있습니다.
- Linux, 그리고 OneDrive 밖. 코드는 WSL2 자체 파일시스템에서 돌아갑니다. 뒤에 올 단계(ROS 2, PX4, C++ 코어)는 Linux를 먼저 지원합니다. 빌드 경로에 동기화 클라이언트가 끼어들거나 공백과 한글이 섞인 폴더 이름이 들어가는 것도 피하고 싶었습니다.
- CPU 렌더러. PyBullet의 TinyRenderer는 카메라 이미지를 소프트웨어로 그립니다. 그래서 GPU가 없다는 사실이 아예 문제가 되지 않습니다.
세 개의 클록
- 물리, 240 Hz. 물리 엔진이 한 스텝에 세계를 1/240초씩 진행시킵니다.
- 컨트롤러, 60 Hz. PID 컨트롤러가 “이쪽으로 날아라”를 모터 네 개의 회전 속도로 바꿉니다. 현재 오차와 그 오차가 쌓인 양, 오차가 변하는 속도에 반응합니다.
- 카메라와 정책, 5 Hz. 0.2초마다 드론이 사진을 한 장 찍고 정책이 다음 행동을 정합니다.
따라서 녹화 프레임 하나는 물리 스텝 48번과 컨트롤러 갱신 12번입니다. 처음에는 예제대로 48 Hz로 시작했습니다. 그런데 이러면 한 프레임에 갱신이 9.6번 들어가서 60 Hz로 바꿨습니다. 이제 고정 틱으로 도는 녹화 루프가 정확히 12번 돕니다.
드론이 실제로 보는 것
그 픽셀 안에 무엇이 있는지 보려고 PyBullet의 세그멘테이션 마스크로 프레임 하나를 렌더링해 세어 봤습니다. 세그멘테이션 마스크는 픽셀마다 그 픽셀이 속한 물체의 라벨을 붙입니다.
이미지에서 정답을 담은 부분이 이렇게 작으면 작은 정책은 더 쉬운 단서에 매달릴 수 있습니다. 4편에서 실제로 그렇게 행동하는 정책이 나옵니다.
카메라 호출 코드는 짧습니다(단순화한 버전이고 전체 코드는 dronevla/camera.py에 있습니다).
def render(self, pos, quat, client=0):
    """Return one frame as (height, width, 3) uint8, alpha dropped."""
    w, h, rgba, _, _ = p.getCameraImage(
        width=self.width, height=self.height,          # 128 x 96
        viewMatrix=self.view_matrix(pos, quat),        # where the drone is and where it looks
        projectionMatrix=self._projection,             # 60 deg vertical FOV, square pixels
        shadow=0,                                      # off: the default doubles render time
        flags=p.ER_NO_SEGMENTATION_MASK,               # off: the policy never sees it
        renderer=p.ER_TINY_RENDERER,                   # CPU software rasteriser, no GPU
        physicsClientId=client,
    )
    return np.asarray(rgba, dtype=np.uint8).reshape(h, w, 4)[:, :, :3]
프레임 한 장을 녹화하는 데 드는 시간
녹화 프레임 한 장을 만드는 모든 단계의 시간을 1,000 프레임 동안 쟀습니다. 워밍업 50 프레임은 버렸고 수치는 중앙값(p50)으로 적었습니다. 전체 실행을 별도 프로세스에서 한 번 더 반복했더니 처리량 차이가 1.7% 안이었습니다.
결정을 바꾼 발견이 두 가지 있습니다.
- 컨트롤러가 물리 시뮬레이션보다 시간을 더 씁니다. 순수 Python으로 짠 PID 컨트롤러를 12번 호출하는 데 9.5 ms가 걸립니다. 이 컨트롤러가 조종하는 환경 스텝(environment step) 12번은 안에 물리 스텝 48번을 품고도 3.5 ms면 끝납니다. 나중에 평가할 모든 정책이 이 비용을 치르므로 모든 실험의 시간 예산에 고정으로 들어가는 항목입니다.
- 기본값이 중요합니다. 라이브러리 내장 카메라는 그림자와 세그멘테이션 마스크를 렌더링합니다. 여기서는 둘 다 쓸모가 없는데 둘을 합치면 렌더 단계가 이미지당 12.8 ms에서 26.5 ms로 두 배가 됩니다. 프로젝트에 카메라를 따로 만든 것도 그래서입니다.
타이밍 루프에서는 각 단계의 시작과 끝에 시간을 기록해 소요 시간을 잽니다(단순화한 버전, 전체 코드).
for i in range(n_frames):
    t_physics, t_control = 0.0, 0.0
    for _ in range(ctrl_per_frame):                  # 12 controller periods per frame
        t0 = time.perf_counter()
        obs, *_ = env.step(action)                   # 4 physics steps each
        t_physics += time.perf_counter() - t0
        t0 = time.perf_counter()
        action[0], *_ = ctrl.computeControlFromState(...)
        t_control += time.perf_counter() - t0

    t0 = time.perf_counter(); rgb = cam.render(pos, quat); t_render = time.perf_counter() - t0
    t0 = time.perf_counter(); png = encode_png(rgb);       t_encode = time.perf_counter() - t0
    t0 = time.perf_counter(); path.write_bytes(png);       t_write  = time.perf_counter() - t0
데이터셋을 감당할 수 있을까요?
계획에서는 프레임당 6~15 KB, JPEG 저장을 가정했습니다. 실제로 재 보니 이렇습니다.
평평한 단색 면이 대부분인 이 128 x 96 프레임에서는 무손실 PNG가 1.4 KB로 가장 작고 JPEG는 2.7~3.9 KB입니다. 측정한 속도라면 계획한 200,000 프레임은 약 1.6시간과 0.3 GB면 됩니다. 계획에 넣어 둔 1.5배 안전 여유를 유지하면 2.4시간입니다. 이 수치는 측정한 속도로 외삽한 값이고 그 데이터셋은 아직 없습니다.
이 편에서 보여 주지 않는 것
- 장면은 바닥과 단순한 도형 두 개뿐입니다. 장면이 복잡해지면 렌더링은 느려지고 압축은 덜 됩니다.
- 측정하는 동안 노트북에는 에디터와 브라우저가 열려 있었습니다. 한가한 머신에서는 이 수치보다 빠를 수도, 느릴 수도 있습니다.
- 여기 나온 것은 전부 시뮬레이션입니다. 실제 드론은 한 번도 날리지 않았습니다.
다음 편
시뮬레이터는 빨라졌지만 아직 믿을 만하다고 할 근거는 없습니다. 2편에서는 실제 드론의 사양서를 가져와 27 g짜리 시뮬레이션 쿼드로터가 거기서 정직하게 빌려 올 수 있는 것이 무엇인지 따져 봅니다. 그다음 모델을 하나도 학습하기 전에 과제와 채점 방식을 확정합니다.
부록
A. 재현성 함정 두 가지 (pybullet 빌드, 첫 CI 실행)
numpy 없이 빌드된 pybullet. Python 3.12용 pybullet은 미리 빌드된 wheel이 없어서 pip가 직접 컴파일합니다. pip는 격리된 환경에서 컴파일하는데 그 환경에서는 numpy가 보이지 않습니다. 결과물은 그래도 동작합니다. 다만 getCameraImage가 Python 리스트를 돌려주게 되어 모든 렌더 시간 측정에 리스트 변환 시간이 슬그머니 섞여 들어갑니다. 그래서 numpy를 먼저 설치하고 pybullet은 --no-build-isolation으로 빌드합니다. CI는 매 실행마다 pybullet.isNumpyEnabled() == 1을 assert합니다. (문제가 터지기 전에 확인해서 잡았습니다.)
첫 CI 실행은 실패했습니다. 시간을 아끼려고 CI 설치 목록에서 torch를 뺐습니다. 프로파일러가 torch를 import하지 않으니 괜찮다고 봤습니다. 새로 clone한 저장소에서 pip check를 돌려 보니 이 방식으로는 통과할 수 없었습니다. gym-pybullet-drones는 stable-baselines3를 요구하고 stable-baselines3는 torch를 요구합니다. 지금 CI는 lock 파일 전체를 설치합니다. torch는 기본 인덱스 대신 PyTorch의 CPU 전용 인덱스에서 받습니다. 기본 인덱스에서 받으면 CUDA 패키지 몇 GB가 딸려 옵니다. 설치 후에는 pip freeze 결과를 lock 파일과 diff합니다. 다음 실행은 통과했습니다.
B. GPU 드라이버를 켰더니 OpenGL 버전이 내려갔습니다
WSL2의 OpenGL은 기본적으로 CPU(llvmpipe)에서 돕니다. GALLIUM_DRIVER=d3d12를 설정하면 Intel GPU를 거칩니다. 두 경우의 glxinfo 출력을 diff해 보니 속도를 얻는 대신 잃는 것도 있었습니다. GPU 경로에서는 OpenGL 4.1, 소프트웨어 경로에서는 4.5까지 쓸 수 있습니다. TinyRenderer는 OpenGL을 쓰지 않으니 지금은 상관없습니다. 나중에 Gazebo를 사용할 때는 이 차이가 중요해집니다.
C. 재현 방법 (설정, 측정, 그림)
Ubuntu 24.04(네이티브 또는 WSL2), Python 3.12, build-essential. 커밋 9849050.
git clone https://github.com/Ckck12/Drone_VLA_Simulation.git dronevla && cd dronevla
git checkout --detach 98490502e80c0cf50a65765619e6d72f03ee88b0
SHA=$(sed -n 's/.*gym-pybullet-drones\.git@\([0-9a-f]\{40\}\).*/\1/p' env-lock-candidate.txt)
git clone https://github.com/learnsyslab/gym-pybullet-drones.git third_party/gym-pybullet-drones
git -C third_party/gym-pybullet-drones checkout --detach "$SHA"

python3.12 -m venv .venv && source .venv/bin/activate
pip install --upgrade pip setuptools wheel
pip install "$(grep '^numpy==' env-lock-candidate.txt)"          # before pybullet
pip install --no-build-isolation "$(grep '^pybullet==' env-lock-candidate.txt)"
pip install "$(grep '^torch==' env-lock-candidate.txt)" --index-url https://download.pytorch.org/whl/cpu
grep -v -e '^-e ' -e '^torch==' env-lock-candidate.txt > /tmp/req.txt
pip install -r /tmp/req.txt
pip install --no-deps -e third_party/gym-pybullet-drones
pip check

python -m dronevla.profile_env --frames 1000 --renderer tiny --out reports/env.json
python scripts/figures/blog01_environment.py      # every figure in this post
참고 자료와 각각에서 가져온 것
- gym-pybullet-drones는 PyBullet 위에 쿼드로터 모델과 PID 컨트롤러를 얹은 라이브러리입니다. → 커밋 단위로 고정하고 컨트롤러는 그대로 썼습니다. 카메라는 기본값 때문에 렌더 시간이 두 배로 들어서 교체했습니다.
- PyBullet Quickstart Guide에
getCameraImage와 CPU용 TinyRenderer가 설명되어 있습니다. → GPU 없는 노트북에서 이 경로를 쓰면 GPU 문제가 아예 사라집니다. - pip: build system interface에 따르면 빌드는 기본적으로 격리된 환경에서 돌아갑니다. → 재현성에는 좋습니다. 하지만 이 격리 때문에 pybullet 컴파일러가 numpy를 보지 못했습니다. 그래서 그 패키지 하나만 격리를 끄고 결과를 assert합니다.
요약 (STAR)
S상황
연재에 쓸 드론 시뮬레이터를 NVIDIA GPU가 없는 노트북에서 돌려야 했습니다. WSL2 + Ubuntu에서 gym-pybullet-drones로 PyBullet을 돌리고 드론 카메라가 시뮬레이션 시간 0.2초마다 128 x 96 이미지를 찍는 구성입니다. 처음 녹화한 1,000 프레임은 제가 작성한 자동 검사를 모두 통과했습니다.
T과제
CPU만 쓰는 시뮬레이터가 쓸 만한 관측을 내놓게 만드는 것이 과제였습니다. 녹화 프레임 한 장에 드는 비용도 재서 계획한 200,000 프레임 데이터셋을 감당할 수 있는지 판단해야 했습니다.
A행동
프레임 20장을 컨택트 시트로 펼쳐 타깃이 잘린 것을 발견했고 원인을 기하에서 찾았습니다. 타깃은 카메라 중심선 아래 35°에 있었는데 카메라 시야는 중심선 아래 30°까지만 닿았습니다. 비행 높이를 0.4~0.6 m로 낮추고 컨트롤러를 60 Hz로 바꿔 프레임마다 정확히 12번 갱신되게 했습니다. 그림자와 세그멘테이션 마스크를 끈 카메라로 라이브러리 카메라를 교체한 뒤 1,000 프레임 동안 모든 단계의 시간을 쟀습니다.
R결과
파이프라인은 초당 34.5 프레임(실시간의 6.9배)을 녹화하고 렌더 한 장에 12.8 ms, 최대 메모리 113 MB를 씁니다. PID 컨트롤러(9.5 ms)가 그것이 조종하는 환경 스텝 12번(3.5 ms)보다 시간을 더 씁니다. PNG는 프레임당 1.4 KB라서 계획한 200,000 프레임은 약 1.6시간과 0.3 GB면 됩니다. 타깃 잘림은 자동 검사 어느 것도 잡지 못했고 이미지를 직접 보고서야 드러났습니다.